Getting Dell XPS Trackpad to work on Ubuntu Hardy

I had trouble getting my Dell XPS M1530 track pad/touch pad to work when I updated the BIOS from A07 to A09. However, it is fairly an easy fix.

Edit your ‘/boot/grub/menu.lst’ file with:
sudo gedit /boot/grub/menu.lst

Then add:
i8042.nomux=1

at the end of the ‘kernel’ line. It may look like below:

title		Ubuntu 8.04, kernel 2.6.22-14-generic
root		(hd0,0)
kernel		/boot/vmlinuz-2.6.22-14-generic root=UUID=446ea0c-57b1-4112-939c-
3f1d74be9f5f ro quiet splash i8042.nomux=1
initrd		/boot/initrd.img-2.6.22-14-generic quiet

Save the menu.lst file and reboot. This should get your track pad/touch pad working.
Reference from Ubuntu Forums.

The US Credit Crunch

Bankruptcy of Lehman Brothers; bailout of AIG. How did this happen?

Let’s ask Warren Buffett, investment guru:

If [AIG] had never heard of the word derivatives, they’d be doing fine. They’d be going to work in the morning and they would have no troubles … I said they were possibly financial weapons of mass destruction, and they had them. They destroyed AIG. They certainly contributed to the destruction of Bear Sterns and Lehman …

… I would say the biggest single cause was we had an incredible residential real estate bubble. I mean you can go back to tulip bulbs in Holland 400 years ago … human beings going through combinations of fear and greed and all of that sort of thing, their behavior can lead to bubbles … 300 million Americans, their lending institutions, their government, their media, all believed that house prices were going to go up consistently … lending was done based on it, and everybody did a lot of foolish things.

Saving the best for last:

… they had all these types from Wall Street, you know, and they had advanced degrees, and they look very alert, and they came with these – they came with these things that said gamma and alpha and sigma and all that. And all I can say is beware of geeks, you know, bearing formulas …

Source

Warren Buffett: I Haven’t Seen As Much Economic Fear In My Adult Lifetime – Charlie Rose Interview – 1 October 2008

Accessing Remote Drive in Linux via SSHFS

There may be a case where you may want to access a certain directory or drive on a remote machine, and mount it to your local PC. For example, I have a headless CentOS box running Apache where all of my web application codes are sitting. Editing those web application codes are a nightmare when there is no Integrated Development Environment (IDE). I can install IDE (like Eclipse) on my Ubuntu box, but I need a way to map the remote /www folder to my local Ubuntu folder. This is very easy in Linux using sshfs.

http://en.wikipedia.org/wiki/SSHFS
https://help.ubuntu.com/community/SSHFS

Install sshfs:
$sudo apt-get install sshfs

Create your local directory and change the permission:
$sudo mkdir /media/directoryname
$sudo chown your-username /media/directoryname

Where “directoryname” is the name of the directory on your local computer where you want to access the files from the remote computer. Let say I want the files on the server to be available at /media/directoryname.

Add yourself to the group “fuse”.
$sudo adduser your-username fuse

To mount the remote directory to your local:
$sshfs your-username@myserver:/www/html ~/directoryname

To unmount:
$fusermount -u ~/directoryname

Drop it, Dropbox!

It’s been awhile since I’m searching for a perfect online backup application. I’ve tried many, but none have really captured my attention. Not until I’ve tried Dropbox.

Dropbox is a free, multi-platform, online backup and synchronization application. My first attraction to Dropbox is because the client tools supports Linux. It also suports Mac OSX, and oh yeah, Windows too. Installation on my Ubuntu Hardy laptop is a breeze. Just download the debian package, and the rest of the installation is pretty straight forward. No extra tricky setup, configuration or anything. Upon the completion of the installation, just point your Dropbox location to a folder path on your machine, and you ready to go.

  An icon installed on the taskbar for easy access.

Online Backup
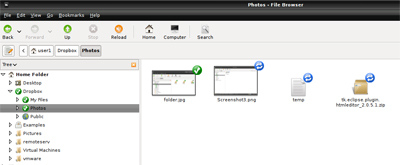
Dropbox currently provides 2GB of storage, which is sufficient for me at this time to backup all of my important files. Backing up files is very easy. Just open your Dropbox folder, and copy-paste the file(s) that you wish to backup to that folder.

Dropbox location on your folder.

Seamless sync
I have a couple of computers at home, which is running Ubuntu 8.04, and also a Windows 2003 machine running at my office. Installing Dropbox client on all of these boxes enabling me to sync all my files between those boxes, seamless, and without much effort at all. Just make sure Dropbox client is running, and those files will be sync automatically.

Dropbox website
Just in case you want to grab or upload your files, but Dropbox client are not installed, you can always go to Dropbox site.

Dropbox web interface

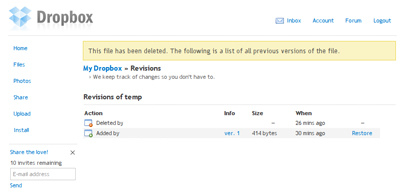
Another cool feature is, the files you stored has “Revisions”. Meaning, you don’t have to worry if any of our files get accidentally deleted or overwritten, since you can always retrieve deleted or the previous version of your files.

Dropbox revision feature

Feel free to watch Dropbox screencast for more info on their features and functions. Have you tried Dropbox or any equivalent online backup application? Feel free to share your experiences.

Save MySQL Output to a Text File

I have just found out a nifty little trick regarding MySQL output the other day. I just had to put this up as a reminder to myself, and also to share with the viewers.

Let say, you want to have the output of your SELECT statement created to a text file. The MySQL database server could be sitting on a different box (or the same machine, but that doesn’t really matter). All you have to do is issue a command in your terminal:

echo "select * from MyTable" | mysql -h mydatabaseserver -u myusername -pmypassword mydatabase > output.txt

That’s it! Just replace the <MyTable>to your table of choice (or just replace the whole SELECT statement to suit your needs), <mydatabaseserver> to your database server name, <myusername> to your database user name, <mypassword> to your password, and <mydatabase> to your database.
The piping ‘>’ will redirect your output to a text file on your desired location.