Gmail Adds Themes To It’s Feature List

Taken from Official Gmail Blog:

Gmail fans have been building unofficial extensions to spice up their inboxes for a while, but up til now themes haven’t been an integral part of Gmail. We wanted to go beyond simple color customization, so out of the 30 odd themes we’re launching today, there’s a shiny theme with chrome styling, another one that turns your inbox into a retro notepad, nature themes that change scenery over time, weather driven themes that can rain on your mailbox, and fun characters to keep you in good company.

Some screen shots of the new theme:

To customize your inbox, go to the Themes tab under Settings. I don’t see the settings available yet on my account, so I might be checking back soon.

UPDATE: The themes setting is available now on my account. Should be available on yours too. Enjoy. Woohoo!!

Protect Your WordPress Directory from Public Browsing

Found a really good WordPress security tips a while ago:

Directories should not be left open for public browsing.

There is a potential problem letting people know what plug-ins you have, or what versions they are. If there is some known exploit that is linked to a plug-in, it could be easy enough for someone to use it to their advantage.

To test whether your site is vulnerable to this issue, just go to http://<your_site>/wp-content/plugins
Your site SHOULDN’T be listing all the plug-ins available on your site.

It’s fairly simple to protect your WordPress installation from public browsing:
1. Make an empty wp-content/plugins/index.html file
Or
2. just add this line in your .htaccess file in your root:
Options All -Indexes

Easier VPN Setup with Ubuntu 8.10

Quite a while ago I’ve posted a way to setup your VPN access using VPNC in Ubuntu 8.04 Hardy Heron. Now with Ubuntu 8.10 Interprid Ibex, things will become much more easier, by using the NetworkManager applet in Gnome.

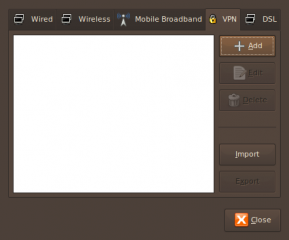
When you have not yet installed any VPN manager, the “Add” button for VPN connections in the applet seems to be disabled. But thanks to a post in UbuntuForum here, I manage to enable the “Add” VPN connection button, and add my office’s VPN connection by a few simple clicks.

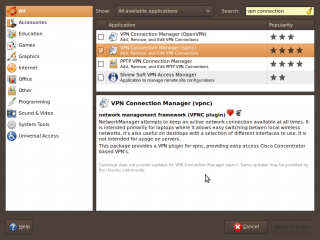
1. Go to Applications -> Add/Remove.

2. From the Show dropdown “All available applications”, and then enter “vpn connection” into the search box.

3. Choose your choice of VPN manager. In my case it’s VPNC.

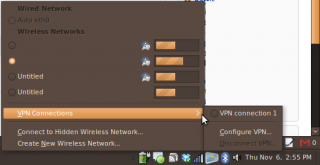
4. Now you can add the VPN connection. The “Add” button is enabled now. Click on the NetworkManager applet -> VPN Connections -> Configure VPN…

5. Click on the VPN tab, click “Add” button

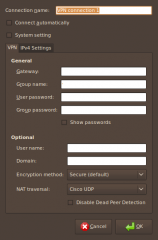
6. Enter your VPN connection details (Gateway, user name, passwords, etc).

7. Click “OK”, and Voila!, your VPN connection is available for you at your NetworkManager applet, shown below:

Enjoy.